Nothing is for sale here. Freewill tips keep the site running. Want to help? → Tip via Paypal
CSS Contextual Selectors
A contextual selector is when a rule is applied to a tag only when it occurs within a specific context in the document. To create a contextual selector you simply list the tags in the nesting order they must appear in before the contextual selector kicks in.In case you don’t know what nested selectors are, see the image below.
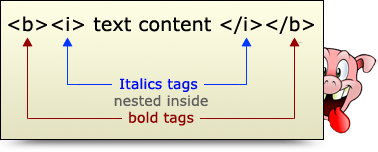
Suppose you have places on your pages where you want a background color when you use italic tags nested inside bold tags to create more emphasis than either bold or italic text will create.
Wow, look at you. That's kind of crazy.
I'll help you do it though. Just add the following rule to your style sheet:
To make a contextual selector, do not separate the selectors with a comma as you would when creating style rules for multiple selectors; instead, separate the selectors with a space.
In that code example, the contextual selector will kick in if you nest italic tags inside bold tags in your source code. Look below see how that looks.
Here’s a sentence in bold type. The contextual selector kicks in here.
If you look in the source code for this page you’ll see I added the contextual selector code just above those two lines. Just below that, you’ll see this:
As you can see, there’s no inline CSS in that code. Because I hadn’t canceled the bold tag before opening the italic tag, the contextual selector kicked in and added the background color.
If I had canceled the bold tag before adding the italic tag the second sentence would have been in italic text only, with no bold type and no background color. The order of the nested tags is what triggered the contextual selector to kick in.
Notice how I canceled the italics tag before canceling the bold tag at the end. This is proper nesting. Always cancel nested tags in the reverse order they were opened.
You may now holler “ye-haw” and dance a little jig.