Nothing is for sale here. Freewill tips keep the site running. Want to help? → Tip via Paypal
Website Planning
As with many things, building a web site will be much easier if you plan ahead. To just start off building web pages and adding to your site without a plan usually means redeveloping your entire site as it outgrows its unplanned structure.
 I almost didn't include this page in my rebuilt site because there have been many software apps and platform solutions that reduce the work of adding new site sections since I first wrote this. In the end though, I decided to keep it because it still illustrates how to plan ahead. If you do use a website building app, it will still make many revisions even easier.
So, if you’re smart, a little extra work in the beginning can save a lot of work in the end. While there are different ways to plan a website, the following three-steps can help you get off to a good start.
» Step 1
Think about the theme of your site and different types of content you want it to have, and sort it all into specific content related categories. Having categorized content also helps with search engine placement, but you won't likely see good search engine rankings with a new site. Think big picture—a little extra thought today will reap benefits down the road.
For example, if you were building a dessert recipes site, you might know you want to specialize in pies, cakes, and cookies. From these categories you’d build a basic structure for your site. Jot down all the categories you want your site to have.
» Step 2
After jotting down your categories draw a simple diagram of the layout. It will help you organize your site structure. Using the desserts example cited above, I’ve drawn an example site plan:
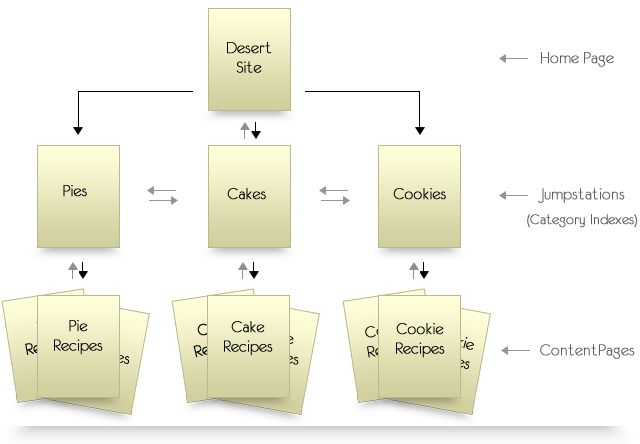
As you can see in the chart, the Index Page has links to the jumpstation level pages, which are the pies, cakes, and cookies categories. Yes, jumpstations are just category pages that link to your individual content pages. I could have simply called them category indexes or sub-indexes, but I like “jumpstation” better. I keep hoping the word will catch on someday so I’ll get invited to all the genius parties. 
Anyway . . . the jumpstation level pages are linked back to the index page (home page—your home page is almost always named "index"), to each other, and each individual jumpstation is linked downward to the content pages relative to that jumpstation. As you add new pages, you only need to add a link to the new page from it’s respective jumpstation.
Making your site as easy to navigate as possible is the kind of user-friendliness that brings people back time and again as long as the content is good.
» Step 3
To make your site have a consistent look and feel while at the same time making it easy for you to develop, it helps to make a read-only template before you start adding content to any pages. With a template you can just add the content and not have to continually code whole pages.
Your template would have all the basic html commands a document needs to set the page structure and make page creation as fast and easy as possible. Do it right, and you only need to add your content to the page and change the “placeholder” text in the head section for the page title and page description and bam-boom, new page!
By making your template "read only" you can't accidently save it with content added. Your computer will prompt you for a different file name if you try. To make it read only right-click the file in File Explorer and choose Properties. When the Properties dialog opens check the Read Only box and click apply. You're all set.
To really do it right, however, requires one more thing…
Suppose you build a 200-page desserts site like the one shown in the diagram above. You have categories for pies, cakes, and cookies. Your site is doing well, and you want to expand it to include pastries. Most of your site is the recipe pages. Think what a chore it would be to go in and add links to the pastry jumpstation on all those individual pages!
Fortunately, you don’t have to—if you set up your navigation using SSI (server side includes).
Using SSI is simply a way to include one or more external files into a web page. So what you do, is place your site navigation menu in an SSI file (a plain text file saved with a .ssi extension), then use the “includes” command to have the file imported into your web page when it loads. If you want to add one or a dozen new categories, you only have to edit that one SSI file!
Learn more about SSI in this Server Side Includes tutorial.
OR...if you already have a website you can use a Search and Replace software app to change all the files at once. Just be sure to make a backup of your files before using a Search and Replace app. It's not hard to do, but things can go wrong and you don't want to mess up every page of your site.
Three closing tips…
- If you want your visitors to be able to contact you then include your contact link on each page.
- To grow a mailing list faster include a subscription box on all your pages.
- Always include a link to your home page from every page on your site.
That’s it. Follow this plan and you’ll have a site that’s easy to grow and develop and your guests will enjoy the thought you’ve put into it. And they'll wonder...
...how did you get so smart?
Continue to part III in this four-part series: Local Site Setup.